
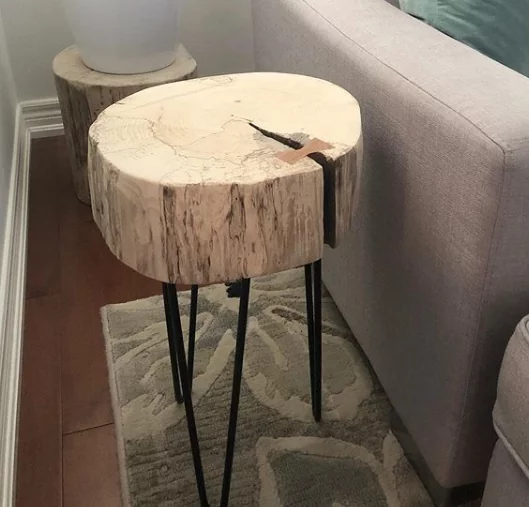
A wood slice coffee table is the best choice if you want to make something that is functional, stylish, modern and cost-effective. Nothing is better than making your own furniture which you can enjoy immensely. Making a slice table is a win-win, You can save money and at the same time, it is a perfect decorative addition to your living room or bedroom.
In this article, we will teach you how to make a wood slice side table. You can make a cool DIY wood coffee table with this easy tutorial. In this article, we try to explain the process step by step. We’ve also used videos and pictures, which can be a great help for beginners who are interested in woodworking.
This article proudly made by the help of our friend, Viktor from Canada(Credits back to him for his great videos and images of the work). His Instagram Profile: @thestumpshop. His Instagram profile is one of the best sources of making wood slice coffee table types where you can find valuable tips.
Thank you, Viktor!
What Do You Need To Make a Wood Side Table?
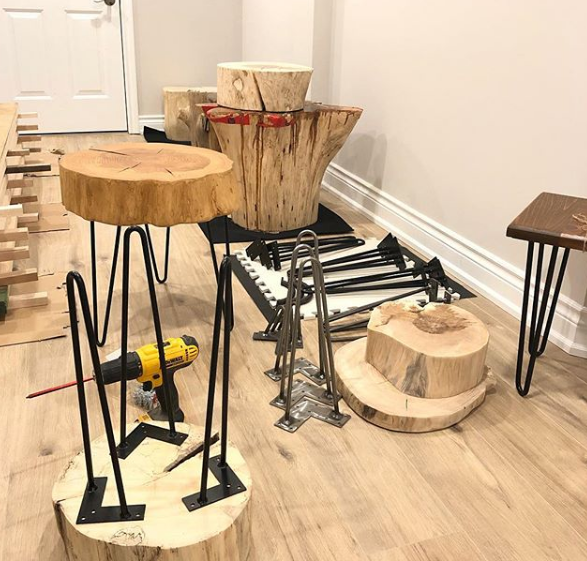
The main material for this project is a slice of a log. You will also need three hairpin legs. But many woodworking projects seem simple to make, while they’re not in reality.
If you are looking for simple wood projects see 22 Simple Woodworking Projects That Sell.
There are many challenges when making a wood slice coffee table. You will also need a long list of woodworking tools and accessories for making a slice side table. In the following, everything you need to make this project is listed.
Materials and Tools Needed:
- Wood slice from a log or tree stump (High diameter)
- 3 Hairpin legs
- Belt sander
- Clearcoat or polyurethane
- Paintbrush
- 6 Screws
- Drill or impact driver with head bit and regular bit
- Chisel
- Sandpaper
- Pencil
- Wood glue
- Oil finish
- Wire brush
Instructions for Making a Wood Slice Coffee Table, Step by Step Tutorial
There are instructions for making a wood slice side table here, a step by step tutorial. The steps in this instruction are prioritized and you should do them all in the correct order. This tutorial is the result of the valuable experience of people who have worked for many years in the field of wood slice coffee table construction.
Lichtenberg Wood Burning eBook

Download Lichtenberg Wood Burning eBook
One of the modern techniques for creating wooden artwork is called Lichtenberg wood Burning. In this eBook, we are going to introduce this newfound art to you.
This technique is known with some different names such as Lichtenberg wood burning, fractal wood burning, and electricity wood art.
This technique should not be confused with wood burning art or pyrography. The art of pyrography on wood is the art of creating motifs and designs by burning with hot metal tools on objects such as wooden surfaces.
Lichtenberg burning is a wood-burning technique for creating designs with electricity.
This eBook is a comprehensive guide on Lichtenberg Wood Burning. All you need to know for Lichtenberg Wood Burning is here.
This is a limited-time offer, order now to get access to the future eBook releases.
1 – Wood Slice Bark Removal
In the first step, you should remove the wood slice bark. It’s simple, yet cool. You need a chisel to do this. This is the start of a long relationship you have with your wood slab during the drying process.
2 – Cleaning Cracks
When the wood becomes completely dry, usually a crack will form on it. This crack shows up because the wood has lost its moisture. You have to clean this crack completely. See the below video. This has to be the most satisfying part of cleaning cracks. You can then smooth the wall of the slit with sandpaper. Of course, you may find another creative way to clean the cracks.
3 – Sanding and Leveling
Sand the top of the wood slice until you achieve a smooth surface. Start with medium-grit sandpaper and work your way up to a finer, higher grit. If you want to make a wood side table without a metal base, you can use a stump. You can use an electric hand planer to align it.
When leveling a stump, you must flatten the bottom first, then flip it over and level the top. Also whenever using an electric hand planer, it is imperative that you do not go over the edges. That would cause huge snipe and ruin the edges. Go halfway then turn the stump. See the below video.
4 – Bow Tie Inlay and Fitting Hairpin Legs
At this point, you can use a trick to solidify the table: the bow tie inlay. This is usually done to avoid expanding the crack in the side table over time.
You can see how to do this in the next video (Full Process).
After the bow tie inlay, flip the table and determine the placement of hairpin legs. The legs should be close enough to the edge that the side table is stable, but shouldn’t extend out past the table edge. You can mark the placement with a pencil. Screw the hairpin legs onto the wood slice using a drill. Each base needs two screws.
You may need to pre-drill holes for the screws or just tap them with a hammer to keep in place before screwing. Flip the table and make sure leg placement works and the table is stable. Don’t worry if the hairpin legs are not stable. No one sees under the coffee table, You can open the screws and drill new holes.
The powder you see in the video is sawdust.
Tips & Tricks When Making a Wood Slice Coffee Table
You may plan to use this coffee table to catering the guests. So the beauty of this project is very important. In a way, this project can be considered a work of art. There are many tips and tricks you can consider when making a wood slice coffee table.
Live Edge Wood Slice Coffee Table
You can remove the bark of your stump or log slice. But many people prefer to let it stay. It gives the side table a rustic feel. Live Edge Wood Slice Side tables are very interesting.
If you don’t want to remove the bark, you need to clean it with a wire brush and then paint the sides with epoxy. You should also pour epoxy into any gaps between the bark and the wood. If not, the bark will easily detach from the edge of the table after a while.
Applying Oil Finish
Rub the surface with wood conditioner to finish this beauty project.
Finish the coffee table with a protective coating according to the coating instructions. You can use Osmo Top Oil, a natural oil (A combination of olive oil and sesame oil) and wax blend because it is non-toxic and water-resistant. You can also use polyurethane, Danish Oil or similar.
The Best Wood To Make a Slice Side Table
One of the most important parts of making your wood slice coffee table is, of course, finding a suitable wood.
You may have some luck at your local lumber store. Keep in mind that shipping might be costly if you buy your wood slice from a store that isn’t local. The stump is extremely heavy!
Softwoods are generally not suitable for this project. Therefore, it can be said that most hardwoods, especially those with beautiful annual growth lines, are suitable for this project.
For example, you can work on a beautiful cedar stump.
Conclusion
In this article, we have provided you a step-by-step tutorial on how to make a wood slice coffee table. All the steps are explained by videos. We also mentioned all the tools you need to make this project.
This one may also be of interest: 5 Simple DIY Tree Branch Project.


Comments
Pingback: Everything About Tree Stump Sprouting - Wood Dad