
Wood has long been one of the most important natural materials in the construction of furniture for human life. Modern wood arts are available in a wide range and today you can find amazing artwork created from wood by many woodworkers on various social networks.
In this article, we will teach you how to make a Lichtenberg resin table. Resin is one of the new materials used in the making process of artworks. Many artists combine wood and resin to create beautiful works. We intend to introduce to you one of these projects.
You have probably seen the types of dining tables and coffee tables that have been made with the help of the Lichtenberg wood burning technique and resin, we will get acquainted with the construction steps of these projects together.
What is Lichtenberg Wood Burning?
Lichtenberg Wood Burning is actually the design by a high voltage difference between two points of wood.
Lichtenberg designs are created by generating a high voltage difference (above 2000 V) between two points of a piece of wood. The resulting image is a three-dimensional example of Liechtenstein’s designs due to the large potential difference in the electric discharge phenomenon.
Tools Needed to Make a Lichtenberg Resin Table
To make a Lichtenberg resin table, in addition to the common tools found in every workshop, you need a sander as well as Lichtenberg equipment.
Lichtenberg Equipment
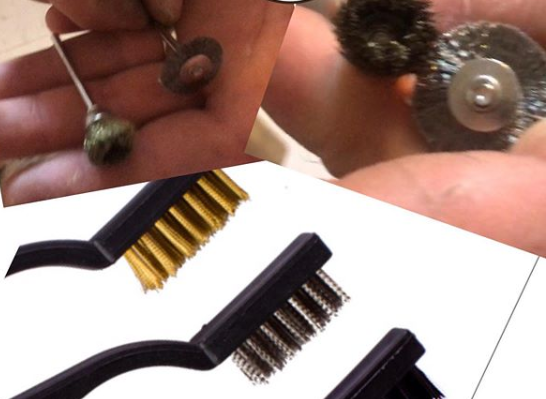
The device needed for this technique is called the Lichtenberg wood burner. You can make the Lichtenberg machine yourself or buy a ready-made one. You will also need a wire brush and cloth to clean the project surface after the pouring process.
Lichtenberg Wood Burning eBook

Download Lichtenberg Wood Burning eBook
One of the modern techniques for creating wooden artwork is called Lichtenberg wood Burning. In this eBook, we are going to introduce this newfound art to you.
This technique is known with some different names such as Lichtenberg wood burning, fractal wood burning, and electricity wood art.
This technique should not be confused with wood burning art or pyrography. The art of pyrography on wood is the art of creating motifs and designs by burning with hot metal tools on objects such as wooden surfaces.
Lichtenberg burning is a wood-burning technique for creating designs with electricity.
This eBook is a comprehensive guide on Lichtenberg Wood Burning. All you need to know for Lichtenberg Wood Burning is here.
This is a limited-time offer, order now to get access to the future eBook releases.
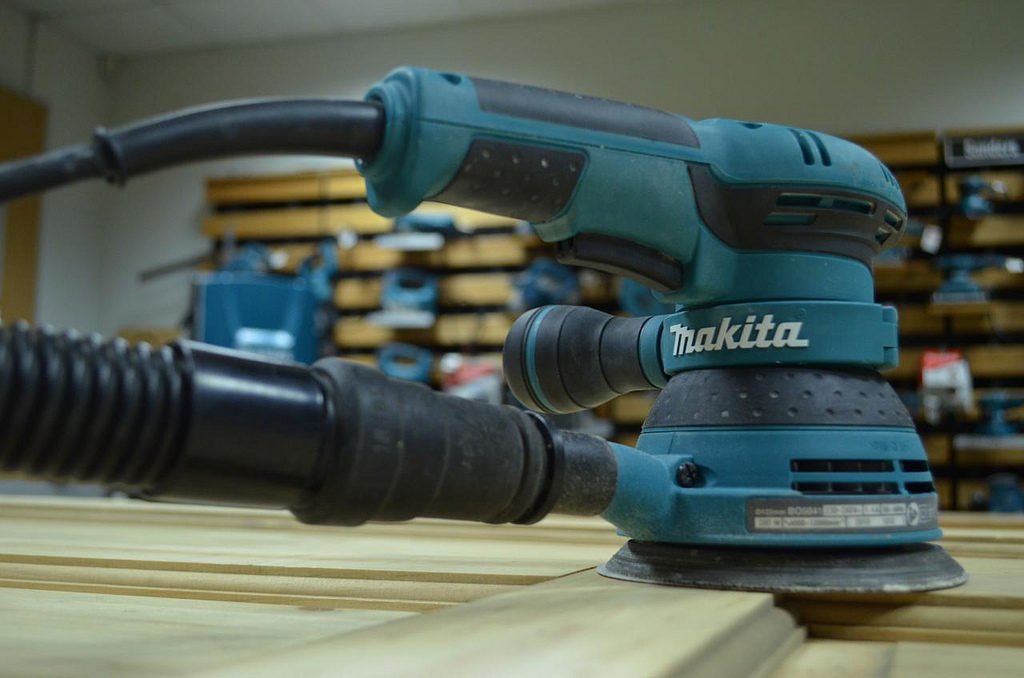
Sander
A sander is a power tool used to smooth wooden surfaces by abrasion with sandpaper (sanding disc). Woodworking sanders are usually powered electrically, and they are being used in auto-body repair work by compressed air. There are many different types of sanders for different purposes, btw we recommend using a random orbital sander for this project.
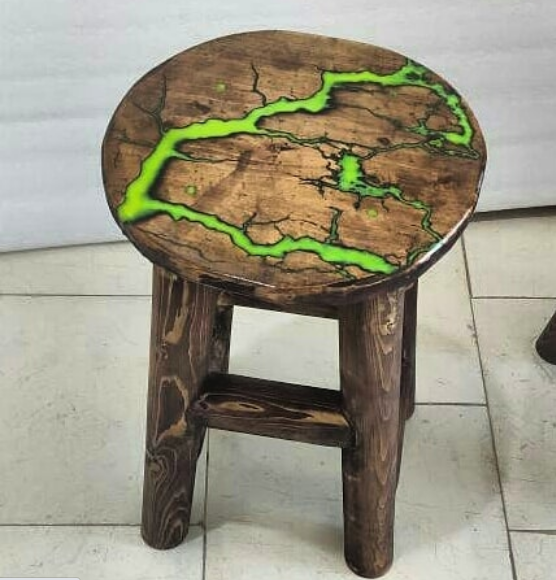
Making a Lichtenberg Resin Table Step by Step
Here are the steps to make a Lichtenberg resin table.
Step 1: Selecting a Piece of Wood to Make a Table
The first step in making any project is choosing the right wood. If you do not pay attention to this, you will not reach the desired result in the end.
In this project, you need wood which burns well, and of course, has good strength. Artificially dried woods have very low humidity and do not burn well in the Lichtenberg process so it’s very hard to create beautiful Lichtenberg figures on them. According to our experience, the best wood for making Lichtenberg resin tables is walnut wood.
To choose the right wood, we recommend you read the article “The best wood for Lichtenberg wood burning” and then return to this page to read the rest of the article.
Important point: The thickness of the wood is very important in this project. Because the Lichtenberg process dries the wood. In woods with low thickness, the chances of the wood warping are very high, and eventually, you will not have a flat table. The recommended thickness for making Lichtenberg tables is 4 to 5 cm.
Step 2: Lichtenberg Burning Process to Create Fractal Figures
After choosing the right wood for the table, it’s time to do the Lichtenberg process. If you are not familiar with the Lichtenberg technique on wood, see Fractal Wood Burning Art, Wood Burning With Electricity.
But note that before starting the Lichtenberg process, be sure to smooth the wood surface with 80 grit sanding disc to increase water permeability to wood.
Step 3: Cleaning the Work Surface
After the Lichtenberg process, you must clean the surface of the project and remove excess charcoal from the cracks of the Lichtenberg figures. You can use a hand-held wire brush to do this. You can also use a drill brush (or a wire brush that you can attach to a drill) to speed up the work. Finally, clean the work surface with a cloth.
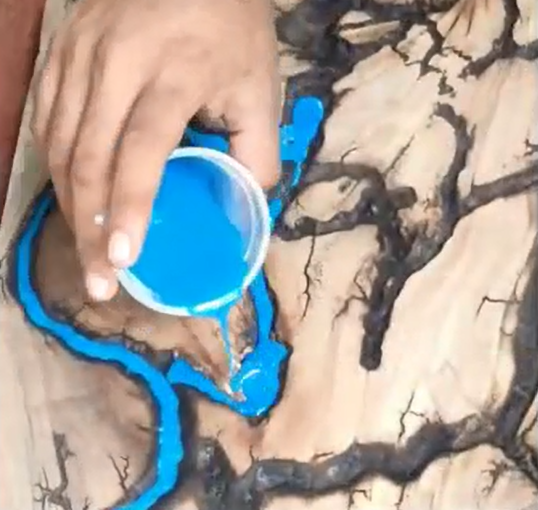
Step 4: Applying the Resin
Now it is time to applying the resin. Pouring the resin in the cracks is a pleasant stage of work. You can use a small plastic cup to do this (You will see the procedure in the video at the end of the article).
Step 5: Sanding Again After the Resin Dries
After the resin dries, it is time for sanding. This step is very important in the quality of the result, so do not hurry. Use a Random Orbital Sander to do this. Continue sanding from sanding disc 80 to 3000 grit. The more time you spend at this stage, the smoother the work surface and the more beautiful your desk will be.
After finishing the sanding work, the resin epoxy may contain haze. So polishing epoxy resin helps to give the necessary shine. For more information see How to polish Epoxy Resin Tutorial.
Step 6: Basic Installation
For different types of tables, you can use different types of metal and wooden bases. It depends on your project. The important thing to note is that it is better to install the bases before applying the resin so that the screws are hidden under the resin.
In the video below, you can see a summary of how to do the above steps to make a Lichtenberg resin coffee table.


1 Comment
good article. its helped. tell more about resin flooring