In this article, we’ll show you how to make wooden engraved gifts.
A wooden engraved gift is a suitable gift for any occasion.
Whether you need a great gift to send to people related to your business or a personal case such as giving it to your love or family, a wooden engraved gift is a suitable choice.
Wooden engraved gifts can be personalized and you can create gifts with your own signature by adding elements such as a name, special message or your brand logo.
For making wooden engraved gifts by yourself, you can start with only a few tools.
Nowadays, thanks to new laser cutters and machines you can easily create designs on wood, but the final product does not have much artistic value as it should when you’re making the design by your hands.
The methods presented in this article are hand-crafts that can be done completely by yourself.
Lichtenberg Wood Burning eBook
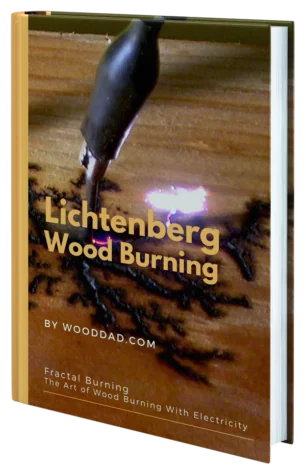
Download Lichtenberg Wood Burning eBook
One of the modern techniques for creating wooden artwork is called Lichtenberg wood Burning. In this eBook, we are going to introduce this newfound art to you.
This technique is known with some different names such as Lichtenberg wood burning, fractal wood burning, and electricity wood art.
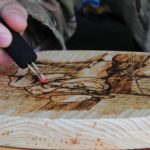
This technique should not be confused with wood burning art or pyrography. The art of pyrography on wood is the art of creating motifs and designs by burning with hot metal tools on objects such as wooden surfaces.
Lichtenberg burning is a wood-burning technique for creating designs with electricity.
This eBook is a comprehensive guide on Lichtenberg Wood Burning. All you need to know for Lichtenberg Wood Burning is here.
This is a limited-time offer, order now to get access to the future eBook releases.
You can easily learn how to make wooden engraved gifts. Stay with us.
Essential Wood Engraving Tools
Wood Engraving Tool
The first tool to make a design on wood is named “Engraving Tool”, yeah! As you just heard! That’s the first tool you’ll need and it’s made from metal.
This is a tool which can be used by hands and also there are different sizes to choose from.
You can choose a suitable engraving tool based on your budget and requirements to buy and use.
This tool consists of two parts:
- Shaft
- Handle
A shaft is made of hardened steel that is terminated by different shapes and sharpened/polished at an angle across it.
The angle of the shaft blade determines how to cut and shape the engraved curves, as well as their depth.
The handle is made from hardwoods.
Handles often are made from a wooden curve bent into the tool to prevent bruising and fatigue of hand during the engraving process.
Usually, for the convenience of using this tool, the handle shape is designed like mushrooms.
You don’t need
Wood Object
You should choose a sample wood object to practice or work on. Before making wooden engraved gifts you must do some practice.
If you are a beginner and this is your first engraving project, Use a cheap and useless wood.
A softer wood such as pine wood or some other softwoods will be faster and easier to engrave than hardwoods.
So softwoods are better for beginners.
Note that the surface of your wood object should be completely clean and free of bumps and color.
You can use a damp cloth to clean the surface of the wood object and then a dry cloth to remove the moisture.
Remember that you need to have enough experience to make wooden engraved gifts, because it represents your personality or your business.
Carbon Paper And Pencil
You should draw a wire-frame of your design on the wood before starting to engrave.
You need a carbon paper to do this work, and a pencil to design ideas in your mind.
You can use black or blue carbon papers. No matter which one, at least you must draw or print a design on the wood.
If you are working on small wooden engraved projects or engraving for the first time, draw or print out a design that has simple shapes.
You may be able to draw the design directly on to the wood. If not, you need a pattern to transfer it onto the wood.
Steps To Make a Wooden Engraved Gift
1- Draw an Outline of Work
First you must consider who are you going to give this gift.
Is he/she a customer, one of your friends, family or your partner?
Next, take a decision that you’re going to make something for your brand or it’s personal work. Given these issues, you should find a good idea to do your artwork.
Specify the shape and color of the wood, the text and design that you want to engrave on the wood and draw an outline on the paper. This is your plan to continue working.
2- Transfer Design on the Wood
You must transfer your text and design onto the wood.
There are different ways to do this.
You can draw it directly onto the wood with a pencil or use a carbon paper (as mentioned in the previous section), but the simplest method of transfer is using a sheet of high-quality vellum tracing paper.
For text, gouges will help to shape the hand-carved letters. Smooth them out or add detailed points or other sharp edges.
You can use ready-made templates to write text and letters. You can also use a ruler to have the letters in a single line.
You can find some good information about how to transfer the design onto the wood in this article: Essential Tools for Pyrography Art | How to Use Pyrography Tools.
3- Engrave Into The Design
This step is the last & main step for making wooden engraved gifts
For carving a line with a complex shape, finish the straight portion first. Once this is complete, move on to the more difficult parts.
Try to engrave straight and deep lines first. There is a wide range of styles for wood engraving that make it a popular & suitable choice for giving out as a gift.